Quantcast
Channel: Tutorials – Unity Coding – Unity3D
Viewing all 58 articles
Browse latest View live

Publish .ipa file from Windows PC to iOS without Mac

$
0
0

With Unity Cloud Build service, you can create iOS apps, without ever needing Macintosh+XCode!

First steps

– Register as an Apple Developer : https://developer.apple.com/programs/enroll/
– Join Unity Cloud Build (if you haven’t already) : https://unity3d.com/services/cloud-build
– Follow cloud build instructions there, its quite simple to setup iOS project
(but you’ll need to have the project at source control somewhere, for example github.com, bitbucket.com)

Creating .CSR file in Windows (Certificate Signing Request)

– Download openssl binary : https://indy.fulgan.com/SSL/ (i used this version )
– Unzip it
– Open Command Prompt on that folder  *Note: Must run command prompt as an Administrator!
– Enter following command> openssl genrsa -out mykey.key 2048
– Download missing openssl.cfg file from this page https://docs.oracle.com/cd/E19509-01/820-3503/ggeyz/index.html and place it to the same folder with openssl (with filename openssl.cfg)
– Enter following command> set OPENSSL_CONF=c:\YourOpensslFolder\openssl.cnf
– Enter following command> openssl req -new -key mykey.key -out CertificateSigningRequest.certSigningRequest  -subj “/emailAddress=yourAddress@example.com, CN=YourName, C=US”
– Now you can upload the generated “CertificateSigningRequest.certSigningRequest” file into Apple Developer site (when creating the Production Certificate in next step)

Setting Up Apple Developer Licenses

– Login into Apple Developer Account
– Go to “Certificates, Identifiers & Profiles”
– Create Production certificate (for App Store and Ad Hoc)
– Upload your .csr file that you generated in previous step
– Create App ID (make it wildcard, so you can use it for many apps)
– Create Provision Profile for Distribution

Creating .p12 file in Windows

– Download your “ios_development.cer” from Production Certificates list (and copy it into your openssl folder)
– Enter following command> openssl x509 -in ios_development.cer -inform DER -out developer_identity.pem -outform PEM
– Uses the mykey.key we created in CRS creation
– Enter following command> openssl pkcs12 -export -inkey mykey.key -in developer_identity.pem -out iphone_dev.p12
– enter password (write it down, as you will need it later)

Building .ipa with Unity cloud build

– Go to unity cloud build: https://unity3d.com/services/cloud-build
– Create new IOS Project (just follow the instructions on the site, its quite simple)
– And when it asks for the Provisioning Profile and .p12 files, you now have them!
– Then hit Build and download your .ipa file

Copying .ipa to iOS Device

– Install iTunes
– Connect ios device to your pc
– Click […] and select Apps (shows all available apps on this machine, not from the ipad)
– Remove your old app from the list (if its there), right click, delete
– Then drag and drop the cloud build .ipa file here (cannot drag and drop it directly to the ipad)
– Then click [] Ipad icon to view your ipad
– Click Apps (in left panel)
– Scroll down to see your .ipa app listed there
– Click Install (or Update) button *it changes to Will Install or Will Update
– Click Apply button at the bottom
– Done! You can now run the app on ipad
*Note: First you need to authorize and sync the ipad to this machine

References:
https://unity3d.com/learn/tutorials/topics/cloud-build/your-first-cloud-build-project
http://help.adobe.com/en_US/as3/iphone/WS144092a96ffef7cc-371badff126abc17b1f-7fff.html
http://help.adobe.com/en_US/as3/iphone/WS144092a96ffef7cc-371badff126abc17b1f-8000.html
https://www.tbs-certificates.co.uk/FAQ/en/openssl-windows.html
http://docs.telerik.com/platform/appbuilder/cordova/code-signing-your-app/configuring-code-signing-for-ios-apps/create-distribution-certificate


Using ImageMagick with Unity

$
0
0

(result image: add watermark/logo stamp to image)

Using ImageMagick with Unity is now possible with the .NET wrapper (github)

Tutorial: Add watermark to image

– Download required DLL files from https://magick.codeplex.com/releases/view/630360 (I used Magick.NET-7.0.4.400-Q8-x64.zip)
– From the zip file, copy “net20\Magick.NET\Magick.NET-Q8-x64.dll” into your Unity project Assets/Plugins/-folder
– From the zip file, copy “net20\Magick.NET\Magick.NET-Q8-x64.Native.dll” into your Unity project root folder (where the project .sln file is also)
– Copy “System.Drawing.dll” (v2.0) from your c: drive into your Unity project Assets/Plugins/-folder (I founded mine from C:\Windows\Microsoft.NET\Framework\v2.0.50727\)
– Download few sample images from Magick.NET examples here and copy those image files into your ‘Assets/Images/’ folder (or adjust the script below to point into correct image path)
– Add the c# script below to your scene and test it!
– See more tutorial sources at Magick github samples directory

example script (c#)

Using SharpNav with Unity

$
0
0

Noticed this SharpNav repository (Advanced Pathfinding for C#) at https://github.com/Robmaister/SharpNav

Since new unity versions support .NET 4.6, this should work in unity too,
the sample script below runs, but not sure how to access the navmesh or navigation features..

Instructions:
– Download SharpNav https://github.com/Robmaister/SharpNav
– Open SharpNav-master\SharpNav-master\Source\SharpNav.sln in VisualStudio
– Right click SharpNav on the Solution Explorer, select Build *Note: this compiles with 4.5.1
– Copy ‘SharpNav.DLL ‘, ‘Newtonsoft.Json.dll’ and ‘YamlDotNet.dll’ files from SharpNav-master\SharpNav-master\Binaries\SharpNav\Debug\ folder into unity project, Plugins/ – folder
– In Unity project, select .NET 4.6 in the player settings *Need to restart unity after this
– Download example mesh and add to scene, from: https://github.com/Robmaister/SharpNav/blob/96ddd939f292a4f4e76b460c1f783cdf1e9bcf41/Source/SharpNav.Examples/nav_test.obj
– Attach script below into empty gameobject
– Drag example mesh into meshFilter field in the empty gameobject script
– Hit Play! (nothing really happens.. would have to access the navmesh, but you are on your own now..*please post comment if you get it working, i’d like to know also : )

**Note: here is older unity project for Recast/Detour library: https://github.com/unitycoder/rcdtcs

Source:

Install & Run Unity in Linux Terminal

$
0
0

see latest releases here: https://forum.unity3d.com/threads/unity-on-linux-release-notes-and-known-issues.350256/

INSTALL

– Login to ssh terminal (i’m using Ubuntu-14.04.1-LTS-64bit)
– download package (i took 5.5.3):

wget http://beta.unity3d.com/download/a2454d41e248/unity-editor_amd64-5.5.3xf1Linux.deb

– install:

sudo dpkg -i unity-editor_amd64-5.5.3xf1Linux.deb

– missing dependencies error..google, help!
– try:

sudo apt-get -f install

– try:

sudo apt-get update
– try:

sudo apt-get upgrade -f

– try install again:

sudo dpkg -i unity-editor_amd64-5.5.3xf1Linux.deb

– if finished successfully, see where it installed:

dpkg --contents unity-editor_amd64-5.5.3xf1Linux.deb

– looks like install folder is: /opt/Unity/Editor/

RUNNING

– Go to the folder:

cd /opt/Unity/Editor/

– try running it:

./Unity -nographics -batchmode -force-free -quit

– view editor log to confirm it runs:

cat ~/.config/unity3d/Editor.log

– looks like requires username or activation..
– “Failed to activate/update license. Missing or bad username and password. Please try again using valid credentials or contact”
– try running with username:

./Unity -nographics -batchmode -force-free -username ***** -password ***** -quit

– “Failed to activate/update license. Timeout occured while trying to update license. Please try again later or contact”
– maybe its this? https://issuetracker.unity3d.com/issues/new-installed-unity-will-report-timeout-error-in-commandline-activiation
– run without batchmode:

./Unity -nographics-force-free -username ***** -password ***** -quit

– seems to work! (log looks fine)*

Next steps.. test with real project and some batch script.


*Update#1:
actually still gives that license error if -batchmode parameters is given..
This might fix, it, but requires starting it manually.. https://forum.unity3d.com/threads/5-4-0p1-fails-to-launch-due-to-license.425277/#post-2941499

some info also, https://forum.unity3d.com/threads/unity-5-3-seems-to-break-batchmode-nographics-on-headless-linux.376074/

REFERENCES

– Unity Commandline parameters: https://docs.unity3d.com/Manual/CommandLineArguments.html

Terrain AlphaMap Texture FilterMode (sharp texture blending)

iOS App crashes only if downloaded from Appstore or TestFlight

$
0
0

Had annoying issue with one ios app, it worked perfectly when build locally from xcode to device,
but after uploading to AppStore, that version crashes in all devices. Solution was rather simple:

Solution

  • Disable [ ] Include bitcode option when uploading your app archive to itunes connect (because apparently they do some compiling in app store, which can break your project, in my case it seems like they stripped out some required classes from MoonSharp..?)


Resources / Tips for debugging TestFlight & AppStore apps (since you cannot connect xcode debugger)

  • Use runtime debug loggers like SRDebugger (paid plugin), or UberLogger (free), can see the actual error message here!
  • From Player Settings enable: “Script Call Optimizations: Slow & Safe” (because Fast & No Exceptions crashes, slow and safe at least wont crash in most cases it seems)
  • View device logs by connecting your iphone/ipad to Mac, then in Xcode select Window / Devices / yourdevice, … view logs (but il2cpp makes it bit useless, ‘crashed at 89829034 + 127837’ ?)
  • Use TestFlight with iTunesconnect users, this means the build is available for testing quite fast after uploading (no need to wait for beta build review for external testers)


Drawing Lines

$
0
0

Hi dear reader!

In this tutorial we want to learn how to draw a line in unity by user mouse movement and interaction.

First we need a component that would be able to render simple lines.
Our choice is ​Line Renderer​, this component is able to renderer lines between given positions so we can pass mouse position and let it to render them.

Getting Started

  1. Create or Open an Empty scene
  2. Create a new Empty Game Object
  3. Create a new c# script and name it ​DrawLine ​then put the below script into it

Now, attach the ​DrawLine​ script to Created Empty Game Object and Play the game.
Press primary mouse button and move your mouse around screen, as you can see the line goes to draw lines in your mouse position.


Explanation

In the script we first check the mouse primary button is pressed or not, when it is pressed we go to next step and try to get the mouse position in world space. After that we try to check if the mouse position isn’t exists in the line points, if the point doesn’t exists then we increase the line positions count and then we add mouse position to line positions and all done.

In the next tutorial we will try to use the line drawing in 2d mode and add a collider to the line.


Resources

This code mainly gathered from a gist and also is available in Unity Library

Thanks for reading.


Source Code

Drawing 2D lines and Adding Collider to it

$
0
0

Hi awesome reader!

In our past tutorial “How to Draw Line” we discussed about drawing a line in the game by mouse
interaction. But sometimes we need to draw a line that collides with our game objects in 2D mode.
So we need to add physics to our line drawing system, then we are going to learn you how to do it.

Getting Started
– Create or Open an Empty Scene
– Change Camera projection to Orthographic, otherwise it won’t work.
– Create a Game Object with Physics Enabled (Add Sprite, Collider and Rigidbody2D)
– Create a new Empty Game Object.
– Create a new C# script called DrawLine2D ​and put the below content in it:

Now attach the DrawLine2D ​script to the Created Empty Game Object and Play the game.
Press primary mouse button and move your mouse around screen, as you can see the line
goes to draw lines in your mouse position. (Don’t let the ball to fall)


Explanation
In the code we first draw the line using mouse movement positions then we add the
positions to the LineRenderer component, then when the points added to LineRenderer, we use
the points to Setup EdgeCollider2D points, so the ball will collide with the line as you can see in
the above.

Try to make a game with this awesome line drawing script!

Resources
The above code mainly gathered from these sources:
https://gist.github.com/EmpireWorld/fcd12ca23cb6cb5dee69b6dc093d6dd5
https://github.com/UnityCommunity/UnityLibrary
Thanks for reading.


Checking Last Known Good Position For A Car In The Track

$
0
0

Working on a small StuntCarRacer-inspired game with a friend.
Some note here about how to get car to return last known good position in the track.

Problems and Requirements

– Player gets stuck hanging in side of the track (1 or more tires hanging outside, cannot move)
– Player falls off from the track
– Should allow respawning into last known good position on the track
– Should reset player rotation towards correct direction

Solutions

  •  Trigger Checkpoints
    • Everytime you enter a trigger, record this as a last good position
    • Should work very nicely, but either need to manually place the triggers or have some logic to automatically do that, which could become difficult with complicated tracks
      • You could manually place dummy objects in 3D modelling tool while making the track, to mark the trigger positions
    • This would easily solve correct rotation (take from trigger forward)
  • Take Closest Track Position
    • Could raycast around the car to find closest track position and lift car to the track on that point
    • Cannot be used, because if you fall of the track, driving in the ground is allowed (so you could take shortcuts then)
  • Take Last Hit Point From Track
    • Kind of works, but often that point could be already barely touching the track and player then falls off again
  • Record Last Known Good Hit Point *Currently using this method
    • Every few seconds:
      • Check that every tire hits the track
      • Check that every tire slope angle is below threshold (like 10° to avoid re-spawning in steep locations)
    • Only issue is that correct rotation is difficult to get, if player was driving in wrong direction, he will be respawned towards that direction also


QuickStart: Unity Visual Shader Editor

$
0
0

tl;dr, use beta10+, install Render-pipelines-lightweight with Package Manager, create/rendering/lightweight pipeline asset, assign it to graphics settings, create/shader/unlit graph, double click to edit in visual editor!


Install & Use Visual Shader Editor

– Download and install Unity Beta : https://unity3d.com/unity/beta-download

– Create New Empty Project

Window / Package Manager, Go to All Packages tab, Select Render-pipelines-lightweigth and click Install (ShaderGraph is included in this package)

– Right click on project window, Create/Rendering/LightWeight Pipeline Asset

Edit/Project Settings/Graphics, Assign your Scriptable Rendering Pipeline asset here (otherwise your shader graph shaders are all pink)

– Create New Shader Graph: Right click on project window, select Create/Shader/Unlit Graph

– Select the created shader, Double Click it to open in Shader Editor, or click “Open in shader editor” in inspector

– Now you can start building your shader!

– Click +  in the blackboard (left side) to add properties to the material (then drag & drop those properties into node canvas to use them)

– Right click over node canvas to add shader nodes

– Click save asset to save changes to shader, then create material and assign your shader to it, and assign that material to some 3D object in scene


To use texture:

– Add Property > Texture

– Drag & Drop the property into node canvas

– Right click on node canvas, Create Node/Texture/Sample Texture 2D

– Connect texture property into texture sampler

– Connect texture sampler output into master color


Resources

– Forum feedback thread: https://forum.unity.com/threads/feedback-wanted-shader-graph.511960/

– Github & wiki :  https://github.com/Unity-Technologies/ShaderGraph

– Examples: https://github.com/keijiro/ShaderGraphExampleshttps://github.com/RubenCUR/ShaderGraph-Examples , https://github.com/UnityTechnologies/ShaderGraph_ExampleLibrary

– Tutorial : “Intro To Shader Graph” https://www.youtube.com/watch?v=fFTBgHOP2JA

DllNotFoundException: libnuitrack – nuitrack.NativeNuitrack.Init

$
0
0

Briefly tested https://nuitrack.com/ in unity, and had this error when trying to run examples:

DllNotFoundException: libnuitrack
nuitrack.NativeNuitrack.Init (System.String config)
nuitrack.Nuitrack.Init (System.String config, NuitrackMode mode)
NuitrackManager.NuitrackInit () (at Assets/NuitrackSDK/Nuitrack/NuitrackManager.cs:218)
NuitrackManager.Awake () (at Assets/NuitrackSDK/Nuitrack/NuitrackManager.cs:117)

There is a thread about it in nuitrack forums, https://community.nuitrack.com/t/dllnotfoundexception-libnuitrack/562/23
and the solution was that you need to set System PATH correctly (and reboot pc after it).

Noticed the issue with Process Monitor, Unity was not looking from the right folder (even though i had added ..bin\ folder in the USER variables PATH)

Solution:
– Download nuitrack SDK (64bit) http://download.3divi.com/Nuitrack/platforms/nuitrack-win64.zip
– Unzip
– Install OpenNI-Win64-1.5.7-Dev.msi
– Edit windows environment variables (type path in start menu). NOTE: Modify SYSTEM variables below (not the USER variables above)
– Add NUITRACK_HOME variable and set path to your folder, for example:  C:\Users\username\Downloads\nuitrack-win64\nuitrack
– Modify PATH variable, add new item, for example:  C:\Users\username\Downloads\nuitrack-win64\nuitrack\bin
– That is the folder containing the missing dll
– Reboot your pc, and test example scenes in unity, should have no more dll error


References:
– Nuitrack installation instructions: http://download.3divi.com/Nuitrack/doc/Installation_page.html
– Nuitrack unitypackage: https://nuitrack.com (scroll down the page, see “Unity SDK & Samples”, click download)

Simple Image Tracking AR Android app using Vuforia

$
0
0

How to build simplest possible android AR app in “few” steps. ( No coding at all! )

  • Download Unity 2018.3.x https://download.unity3d.com/download_unity/06548a9e9582/UnityDownloadAssistant-2018.3.13f1.exe
  • Install with these 3 options selected: [x] Unity, [x] Android Build Support, [x] Vuforia support. *Visual studio might be listed here also, if you don’t already have it, install that also.
  • Start Unity, Create new Project
  • File / Build settings… Switch to Android platform
  • From Player Settings, do all these:
    • XR Settings / Enable [x] Vuforia Augmented Reality Support *If you didn’t install Vuforia plugin initially, it should open downloader here.
    • Company Name: Change it from DefaultCompany to something else, otherwise build fails
    • Other Settings / Package name: Change the default value into something else, like com.myar.vuforiaar, otherwise build fails
    • [ ] Android TV Compatibility should be disabled by default already (otherwise build fails)
  • From Unity menu, select GameObject / Vuforia Engine / AR Camera
    • “import vuforia engine assets” appears, click Import
  • In Hierarchy window
    • delete old “Main Camera” gameobject
    • Select “ARCamera” gameobject and click “Vuforia Engine Configuration” in the inspector
  • *Optional: You can click that download new vuforia engine version and install it (probably need to close unity at that point)
  • In Vuforia Configuration
    • Click Add License (it opens website https://developer.vuforia.com/license-manager )
    • Log in or create vuforia account
    • Once you are in at https://developer.vuforia.com/vui/develop/licenses
    • Click “Get Development key”
    • License name: whateverAR, [x] check box, Click Confirm
    • From License manager list, click your newly created license name and copy that long string and Paste it into “App License Key” field in unity inspector (at Vuforia Configuration)
    • Click “Add Database” (opens website https://developer.vuforia.com/vui/develop/databases?dataRequestedForUserId= )
    • Click “Add Database”, give some name, Type = Device
    • Click that newly created database from the list
    • Click Add Target, Single Image, Width = 1 (then image equals 1 unity unit), name: anythinghere
    • And for the image, select your AR target tracking image (this is the image that objects will appear into. If you dont have printer, google some image of a product that you have at your house, like some product logo, milk box side image, and crop & upload that)
    • If after upload the Rating value is very low, you might have issues tracking with this marker, try something else
    • Then click “Download Database All”, Select a development platform: Unity
    • Double click the downloaded unitypackage to import it to your project
  • From Unity Menu, GameObject / Vuforia Engine / Image (adds image tracker to scene, it should contain your marker image already)
  • In Hierarchy window
    • Select “ImageTarget” gameobject
    • Right click over it, 3D Object/Sphere
  • 3D sphere is now child of your “ImageTarget” gameobject, this means, once the tracker is detected, these child objects will become visible at this position. You can move and resize the sphere if want to. (or add other objects there)
  • CTRL+S to save scene, lets say create folder Scenes/ and save ardemo.scene there
  • File / Build Settings
    • Click “Add Open Scenes”, to add your scene into build list
  • Hit “Build” button, set output path for .APK somewhere and wait
  • Done! Your first AR app should now display 3D sphere when the marker is visible on device camera.

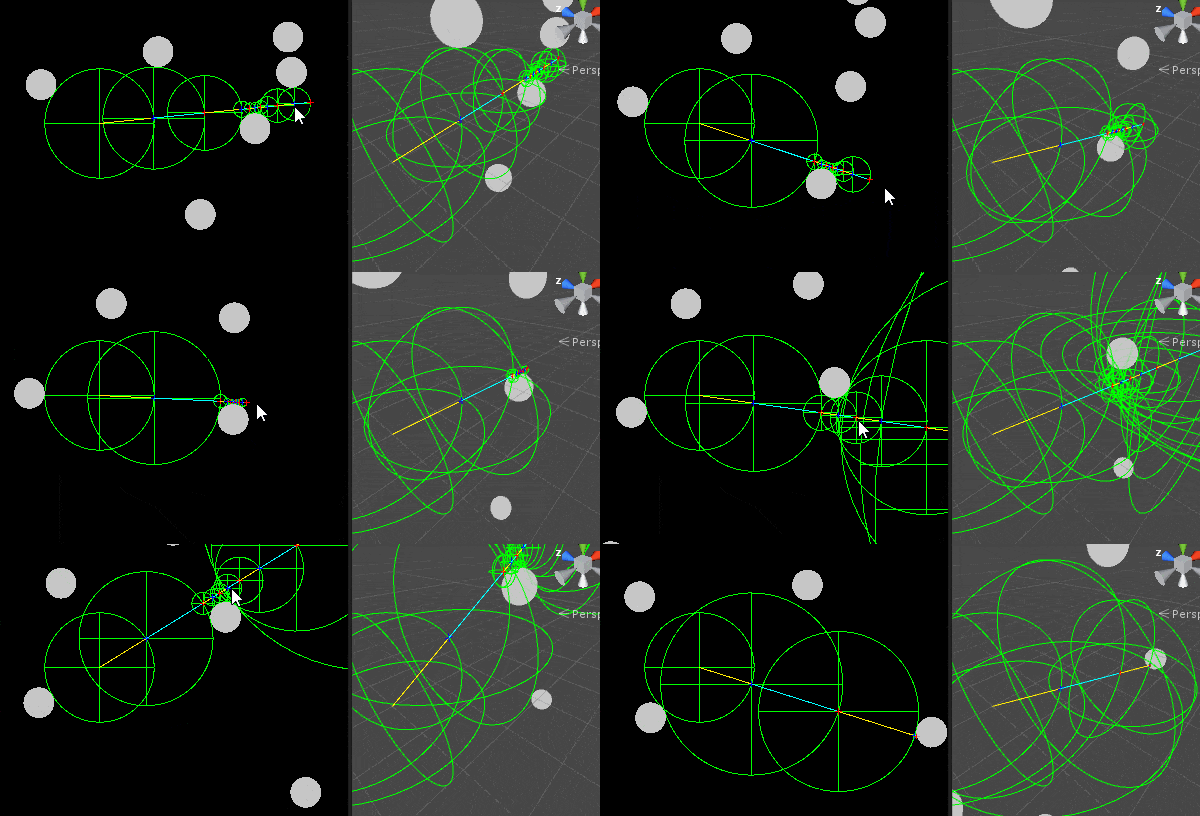
Ray Marching

Creating Single .EXE from Unity Build Files

$
0
0
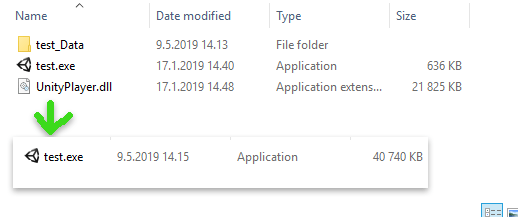
Nice single .exe file for the customer!

Using Enigma Virtual Box

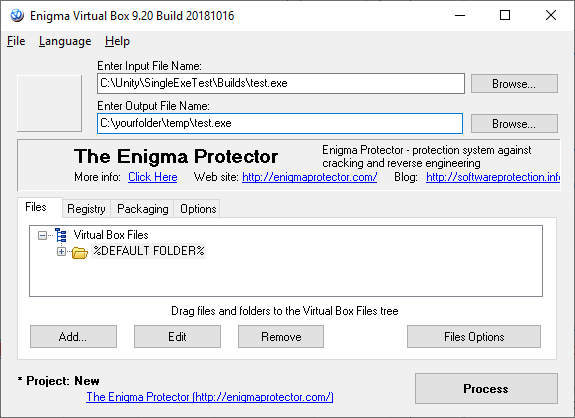
https://enigmaprotector.com/en/downloads.html

– Select input file name: (This is .exe file from unity build)
– Enter output file name: (this is the output single exe file) *This MUST be same as the original .exe file name, so that data folder gets found.
– Click Add / Add Folder Recursive ..
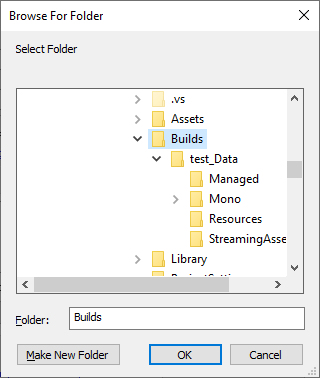
– Browse to your Build folder, for example ../Builds/ within your unity project (next to Assets/ folder)
– Now you can test your single exe file
– Note: Loading data from StreamingAssets/ folder within the single exe app seems to work also.

Select whole Builds folder, if that contains your exe and data folder

Warp

Tested this tool also, works, but seems to leave console window open when exe is run..
https://github.com/dgiagio/warp#windows-1

TODO

– Check if enigma supports command line arguments, then you could make it automatic with some editor scripts!

Enable HDR Color picker for Shader or Script

$
0
0

I needed HDR color for some old Unlit/Color-shader, and for c# script also, found out that you can add this attribute for the shader:

// BEFORE (no hdr color picker)
_Color ("Main Color", Color) = (1,1,1,1)
// AFTER (hdr color picker)
[HDR]_Color ("Main Color", Color) = (1,1,1,1)

And for the script:

// BEFORE
public Color shouldbeHDR = Color.white;
// AFTER
[ColorUsage(true, true)]
public Color shouldbeHDR = Color.white;

More info:
https://docs.unity3d.com/ScriptReference/ColorUsageAttribute.html
https://docs.unity3d.com/Manual/SL-Properties.html

Also make sure your Camera has [x] HDR enabled

Left: No HDR | Right: HDR enabled

Deploy to Android device with wireless connection

$
0
0

Using windows Command Prompt:

// check if your device is present
adb devices
// get device ip address (see inet row)
adb shell ip addr show wlan0
// enable tcpip and port
adb tcpip 5555
// connect device (use your device ip address)
adb connect 192.168.1.90:5555

Now you can remove usb cable, and deploy through wifi.
(This works with Oculus Quest and other android based vr devices)

// can check if your wireless device is connected
adb devices

// logcat works too
adb logcat -s Unity ActivityManager PackageManager dalvikvm DEBUG -v color

Read File from Oculus Quest /sdcard/ Folder

$
0
0

Solution:
– Place your file into some sdcard folder (by browsing there with Explorer), for example:”This PC\Quest\Internal shared storage\Download\myfile.txt”
– Add script to load file:
var t = File.ReadAllText("/sdcard/Download/myfile.txt");
– From Unity menu select: Oculus/Tools/Create store-compatible AndroidManifest.xml
– Modify Assets/Plugin/Android/AndroidManifest.xml, add this line after </application> :
<uses-permission android:name="android.permission.READ_EXTERNAL_STORAGE" />
– Build & Run *Note: run fails, due to missing launch action.. so run the app manually in device (from library/unknown sources)
– Allow Read permissions when you start the app

Optional:
– You can enable LAUNCHER, to make Build & Run work, by replacing this line:
<category android:name="android.intent.category.INFO"/>
with:
<category android:name="android.intent.category.LAUNCHER"/>
– Can also disable permission request (while doing tests), by modifying this line:
meta-data android:name="unityplayer.SkipPermissionsDialog" android:value="false"
into:
meta-data android:name="unityplayer.SkipPermissionsDialog" android:value="true"
– Can also add Write permissions:
<uses-permission android:name="android.permission.WRITE_EXTERNAL_STORAGE"/>

My AndroidManifest.xml:
https://gist.github.com/unitycoder/a8a827311ea0837b06af6ccde85effec

My Build Settings for Install location and Write Permissions (they don’t seem to affect much?)

Resources:
https://developer.oculus.com/distribute/latest/concepts/publish-mobile-manifest/
https://forums.oculusvr.com/developer/discussion/78412/accessing-local-files

Reading Minecraft World into Unity (using Substrate)

$
0
0
Minecraft terrain in unity!

Quick test for reading Minecraft worlds into unity.
Note: example code uses particle for each block, so it gets pretty slow.

Compile Substrate.dll:
– download this repository https://github.com/minecraft-dotnet/Substrate
– unzip, open Substrate-master\SubstrateCS\Substrate.sln
– Solution Explorer: Right click over Substrate (NET4), Set As Startup Project
– Select Release (from the configuration dropdown in toolbar, although default “Debug” works also)
– Press F5 to compile
– Should see message in output: “========== Build: 1 succeeded, 0 failed, 0 up-to-date, 0 skipped ==========”
– Go to the output folder (shown in the output window above that previous line)
– Copy “Substrate.dll” into your unity project, Assets/Plugins/Substrate/x64/ folder
– Note: You need to compile 64bit version (which should happen by default)

Minecraft:
– Start minecraft with 1.12.2 version (apparently substrate is designed up to that version?)
– Create new world, enter into it once, then can exit minecraft

Unity:
– Test with this script: https://gist.github.com/unitycoder/e0bb32b9d6ece0b4bde7be270e2e2a6f
– Add ParticleSystem into scene, then assign it to the script (see below for my particle system settings screenshot)

References / Resources:
– Block ID’s http://media.dinnerbone.com/uploads/2013-09/files/28_00-44-23_YfmAkomVI.txt

TODO
– Use mesh (instead of particles)
– Optimize..
– Load chunks-on-demand
– Add player
– Test with unity raytracing!

Using particles and loading 100 chunks is not the best idea..
Particle system settings (1)
Particle system settings (2)
Drawing air blocks (but instead can just skip them)

Using raylib.dll in Unity

$
0
0

raylib is https://github.com/raysan5/raylib
There are c# bindings available at https://github.com/ChrisDill/Raylib-cs

Steps:
– Download raylib.dll from releases (i took raylib-2.5.0-Win64-msvc15.zip)
– Unzip and copy \raylib-2.5.0-Win64-msvc15\bin\raylib.dll into your Unity project Plugins/ folder
– Download c# bindings repository (click “clone or download” .. as zip)
– Unzip and copy \Raylib-cs-master\Bindings\ folder into your Unity project (under Assets/)
– Test with example script: https://gist.github.com/unitycoder/dfd1c355ef6800604eecd99c5ebee434
– Then check raylib wiki + examples to see if there is something useful for Unity side!

raylib example running from unity

Run Unity Cloud Build based on Github Commit message using Github Actions

$
0
0

This should had been easy, but unity cloud build system has every secret id hidden in different places and using different names..

  • Create github action (click Actions from your repository)
  • click “Skip this and set up a workflow yourself”
  • copy ready to use script from: https://github.com/unitycoder/UnityCloudBuildGithubActions/blob/main/.github/workflows/main.yml
  • you can modify “branches: [ main ]” if you are not using “main” branch
  • you can modify the required commit messages, for android its the: “#BUILD_ANDROID”
  • you can modify the required commit messages, for ios its the: “#BUILD_IOS”
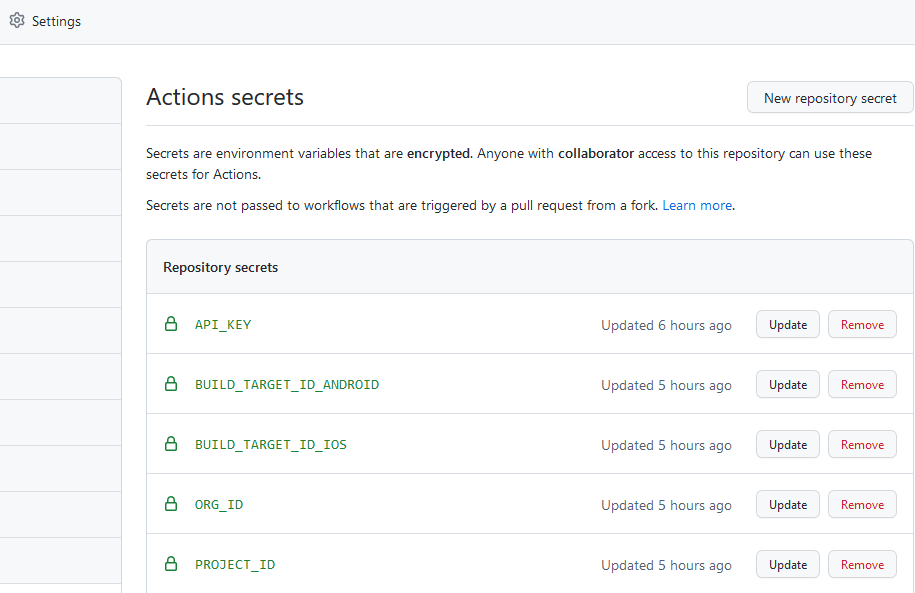
  • Add secrets to your repo Settings/Secrets
  • collect secret keys from https://dashboard.unity3d.com , If you are invited as a collaborator check https://dashboard.unity3d.com/settings/account/guest-projects
  • Select your cloud project
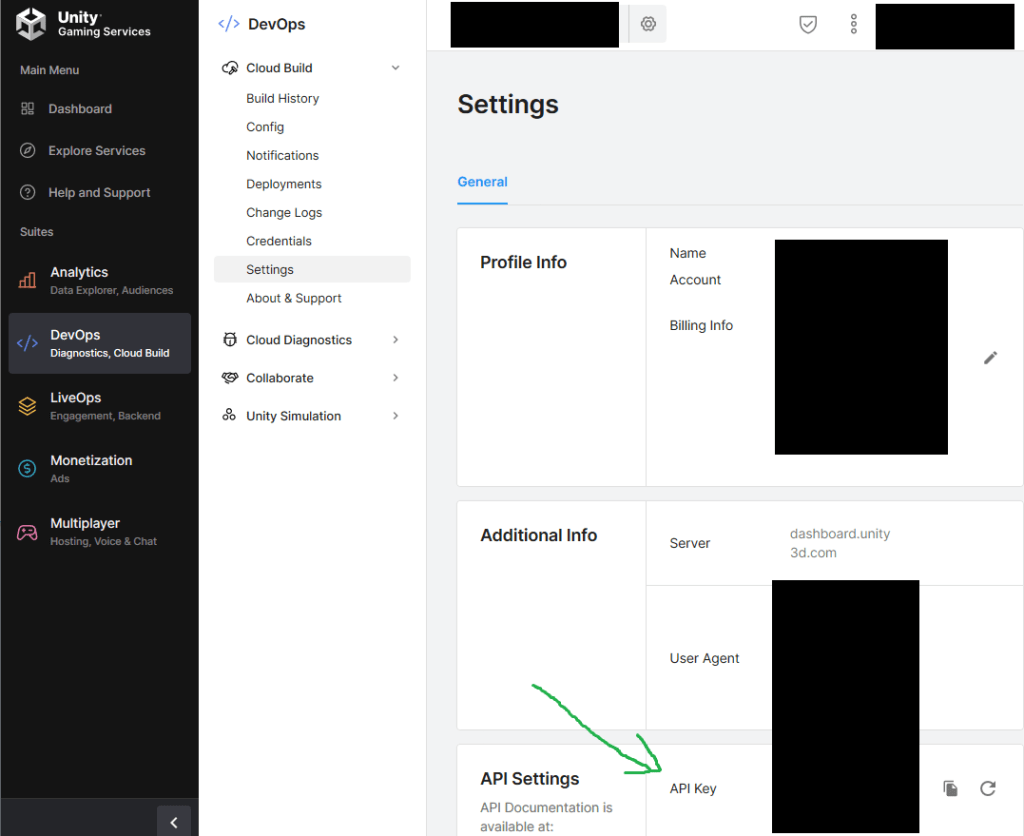
  • get API_KEY from Devops/Settings page (at API Settings row)
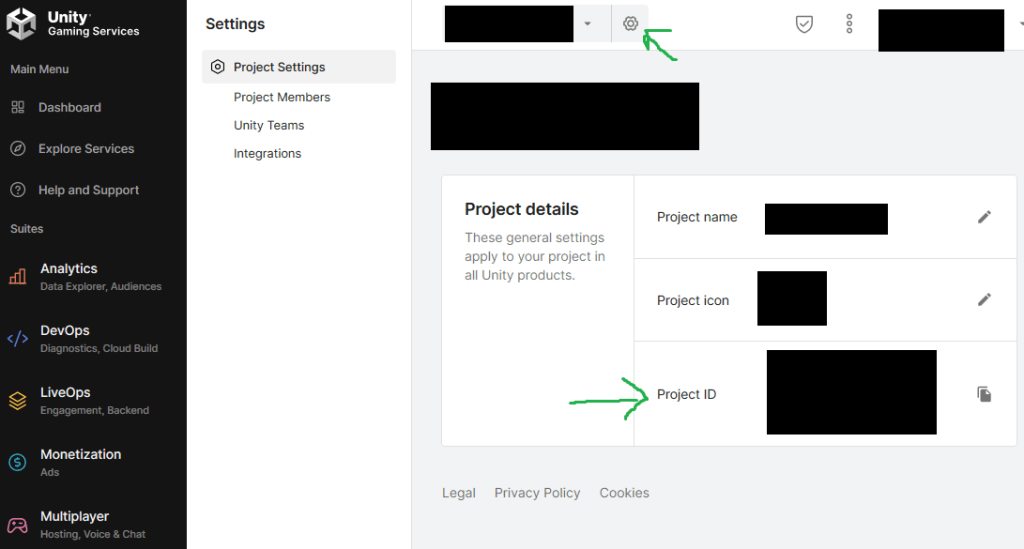
  • PROJECT_ID from Project/Settings page (top bar, settings icon next to project name)
  • ORG_ID from your current dashboard (when viewing project). Looks something like https://dashboard.unity3d.com/organizations/[ORGIDHERE]/projects/..
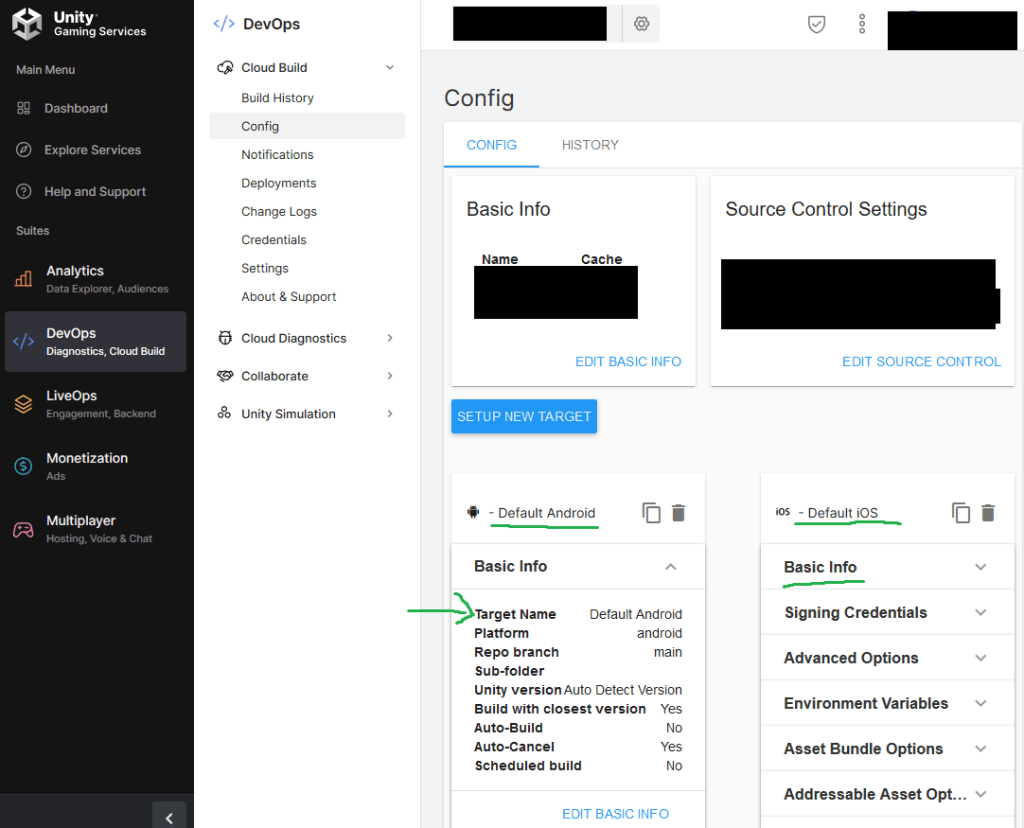
  • BUILD_TARGET_ID its from DevOps/Config/, those targets that you have deviced there. Click Basic info, its the “Target name:” row, this is actually Build Target ID (but unity named it as “Target name”) and for some reason it defaults to some bad id, like “Default Android”.
  • Note: make it lower case, and replace spaces with – (minus), so “Default Android” becomes “default-android”
  • Note: You can change this id by clicking that blue “edit basic info” link below the opened basic info panel. (not the top panel where it shows “basic info” in title)
  • From “Edit Basic Info” you can now also disable [x] Auto Build (this would build on every commit), and set correct Branch if needed.
  • Now make a commit on main branch, with commit message that includes “#BUILD_ANDROID”, then check from Cloud Build system that build gets started (can take less than 1 minute)

Script info:
// this line checks if commit message contains #BUILD_ANDROID string and only then it runs the curl POST message
if [[ "${{ github.event.commits[0].message }}" == "#BUILD_ANDROID" ]];

Errors:*1
{"error":"Not authorized. User does not have correct permissions to perform this operation."}
Check your Secrets, probably bad ORG_ID.

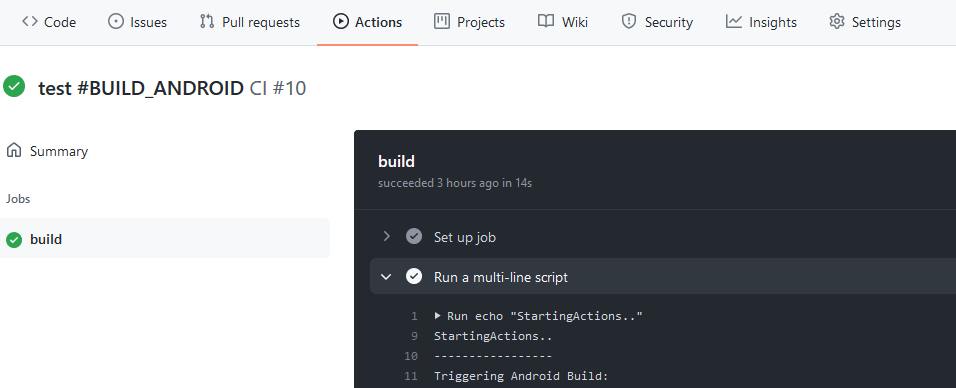
*1: You can view log output from Actions/ All Workflows / click the action (has commit message and with green checkmark next to it), then click “build” (this job name was set in the actions script), then click “Run multi-line script”, to open that task log.

Project ID is here
API Key is here
Build Target ID is that string (note: convert to lower case and replace spaces with “-“)
Organization ID is at the URL address (numbers after organizations/)
Can view console log for each action/task (for possible errors)
github secret tokens
Viewing all 58 articles
Browse latest View live