Quantcast
Channel: Tutorials – Unity Coding – Unity3D
Viewing all 58 articles
Browse latest View live

Simple Event & Delegate Script

$
0
0

events_delegates

Just a quick test on events & delegates (taken from this live tutorial)
– New scene
– Add Sphere object to the scene (and move it into Main Camera view, for example 0,0,0)
– Create new script: FireEvent.cs

using UnityEngine;
using System.Collections;

public class FireEvent : MonoBehaviour
{
    public delegate void Clicked();
    public event Clicked WasClicked;

    void OnMouseDown()
    {
        if (WasClicked!=null) // we have someone listening
        {
            Debug.Log("We have a listener, send event");
            WasClicked();

        }else{

            Debug.Log("Nobody is listening!!!! noooooo");
        }
    }
}


– Attach “FireEvent.cs” script into Sphere gameobject
– Create new script: Listener.cs

using UnityEngine;
using System.Collections;

public class Listener : MonoBehaviour {

    public GameObject EventManager; // reference to event firing object

    void Start()
    {
        // subscribe to the event (attach listener)
        EventManager.GetComponent<FireEvent>().WasClicked+=SomethingWasClickedOutside; // call this function if event is fired
    }

    void SomethingWasClickedOutside()
    {
        Debug.Log ("Listener.cs: Event was fired!");
    }
}

– Create new Empty Gameobject
– Attach “Listener.cs” to that empty gameobject
– Assign Sphere into the “EventManager” field in the inspector
listener_events
– Hit play and then click the Sphere with mouse, event should be fired.

More info:
http://unity3d.com/learn/tutorials/modules/intermediate/scripting/events
http://unity3d.com/learn/tutorials/modules/intermediate/scripting/delegates


Leap Motion PassThrough Threshold Shader

$
0
0

leap_motion_threshold_shader_unity

You can add adjustable threshold to Leap Motion passthrough shader, so that your hands are more visible (less transparent) in the overlay image.

TUTORIAL
– Download unity examples package, https://developer.leapmotion.com/downloads/unity
– Import package to Unity
– Open “PassthroughWithTracking.scene”
– Select “Quad” from hierarchy
– Enable [x] Overlay image (in LeapImageRetriever script component)
– Edit shader file: “LeapIRUndistorted_foreground.shader”
Add these customisations to the shader:


// FIND LINE
_MainTex ("Base (A=Opacity)", 2D) = ""
// INSERT AFTER IT
_Threshold ("Threshold", Float) = 0.1

// FIND LINE
uniform float4 _Color;
// INSERT AFTER IT
uniform float _Threshold;

// FIND LINE
color.a *= a;
// REPLACE WITH
color = float4(a,a,a,step(_Threshold,a)) * _Color;

– Save, now test the scene and adjust threshold value from inspector if needed (try adjusting material color value also).

Notes:
– LeapImageRetriever script re-assigns the shader at start, so your inspector threshold value might resets to default..?
– Adjust material color for skincolor in the inspector

More info:
– step() : http://http.developer.nvidia.com/Cg/step.html
– Leap+Oculus : https://www.leapmotion.com/product/vr
– [x] Allow images must be enabled in Leap Control panel : https://developer.leapmotion.com/gallery/oculus-passthrough 


Pixel grass with rounded edges effect

Error: Android SDK is outdated

$
0
0

android_sdk_error

Got this error message on building .apk:

“Android SDK is outdated
SDK Build Tools version 19.1 < 21”

And in the console:
“Error building Player: CommandInvokationFailure: Unable to update the SDK. Please run the SDK Manager manually to make sure you have the latest set of tools and the required platforms installed. ..”

What didnt work:
– Trying to update components in the SDK manager (even if downloaded all package updates) *I had previously used “adt-bundle-windows-x86_64-20131030”

Solution:
– Download latest standalone SDK tools : https://developer.android.com/sdk/index.html#Other
– Install it, assign that folder as android SDK, in unity, Edit/Preferences/External tools/Android SDK location (select the root folder)


PointEffector2D

$
0
0

Unity5 comes with new PointEffector2D

How to use it?
– Add sprite to scene
– Add CircleCollider2D (or some other 2D collider)
– Enable: [x] Trigger *Note: Effector works without trigger enabled also, but only when other object is touching the collider.
– Enable [x] Used by Effector
– Add PointEffector2D component
– Adjust Force magnitude (if it doesnt seem to affect enough, negative values will attract and positive values will repel objects away)

Then just add other objects that the effector will affect:
– Add sprite
– Add rigidbody2D
– Add CircleCollider2D (or some other 2D collider)

Image#1: Point effector, note the circle collider radius is adjusted, that is the area it affects.

point_effector2d_1

Image#2: normal object with collider2D and rigidbody2D, when it enters point effector area, it gets affected by it

point_effector2d_2

Results for the settings above:

point_effector2D

WebGL Build – Custom Loading Effect

$
0
0

webgl_loader_effect

Webgl build progress meter seems stuck at the end sometimes,
so it would be nice to have some “loading/uncompressing” effect there..

WebGL example:
http://unitycoder.com/upload/demos/CustomWebGLLoader/ *its copy of my LudumDare32 entry

– Caching seems to cause some problems though, effect starts too early or too late?
– Probably need to use some background worker, as it hangs on the final step..? (or use CSS animations, they are in separate thread?)
– Could make it as a ready template, so no need to edit code after publish
– Using animated gif as background instead would be better, no need javascript timers

Steps for adding the effect to webgl build: (^or check source of that webgl page)


// OPEN FILE
index.html

// FIND LINES
<p class=”footer”>&laquo; created with <a href=”http://unity3d.com/” title=”Go to unity3d.com”>Unity</a> &raquo;</p>
<script type=’text/javascript’>

// INSERT AFTER THOSE LINES
var bgTimer=null;
var originalBgColor = document.getElementsByTagName(“body”)[0].style.backgroundColor;
function LoaderEffect() {
document.getElementsByTagName(“body”)[0].style.backgroundColor = “#” + (Math.round(Math.random() * 0XFFFFFF)).toString(16);
}
function StopLoaderEffect()
{
window.clearInterval(bgTimer);
document.getElementsByTagName(“body”)[0].style.backgroundColor = originalBgColor;
}

// FIND LINE
return function(text) {

// INSERT AFTER THAT LINE
if (text.indexOf(“Creating OpenGLES2.0 graphics device”)>-1) StopLoaderEffect();

// FIND LINE
printErr: function(text) {

// INSERT AFTER THAT LINE
if (text == “run() called, but dependencies remain, so not running”)  bgTimer = window.setInterval(“LoaderEffect()”,100);

References: (for javascript)
http://www.w3schools.com/jsref/met_win_setinterval.asp
http://www.w3schools.com/jsref/met_win_clearinterval.asp
http://www.w3schools.com/jsref/prop_style_backgroundcolor.asp
http://stackoverflow.com/questions/1484506/random-color-generator-in-javascript

Creating car mirror with rendertexture

$
0
0

Creating simple car mirror using rendertextures.

HOW TO
– Right click at Project window, Create / RenderTexture
– Rename “New Render Texture” into something else, like “MirrorRT”
– Drag & Drop “MirrorRT” into 3D object (preferably some flat object) at scene view (it automatically creates Materials/folder and “MirrorRT” material there and assigns to the object)
– Right click at Hierarchy window, Create / Camera
– Rename “Camera” into something else, like “CameraMirror”
– Position “CameraMirror” into that 3D mirror object and rotate it so it looks toward the mirrored view direction
– Make “CameraMirror” the child of 3D mirror object, so that it follows it
– Disable [ ] GUILayer and [ ] AudioListener components from “CameraMirror”
– Optional: Adjust Clipping Plane Near values for both cameras to 0.01 or so (if your model gets gets clipped near camera)
– Select rendertexture file from Project window and Drag & Drop it into “CameraMirror” TargetTexture field
– Hit play!

EXTRAS
– Select “MirrorRT” from Project window to adjust render texture resolution & settings
rendertexture_settings

Resources:
– I used this free car model : http://www.turbosquid.com/FullPreview/Index.cfm/ID/717576
(had problem with the mirror mesh UV mapping, so made small script to temporarily fix it : PlanarUVMap.cs, attach it to the mesh that needs fixing)
– RenderTexture manual : http://docs.unity3d.com/Manual/class-RenderTexture.html

Image#1: Broken & fixed UV map (later also mirrored UV map horizontally)

fix_uvmap_1

Image#2: Posioning “CameraMirror” into mirror (on this 3D model “Chrome_20” is the mirror mesh and camera is set as child of it)
mirror_camera_position

Building .apk with Release mode

$
0
0

Uploading .apk to Google Play can give error message:
“Upload failed You uploaded an APK that was signed in debug mode. You need to sign your APK in release mode.”

Building .apk with Release mode

– File / Build Settings
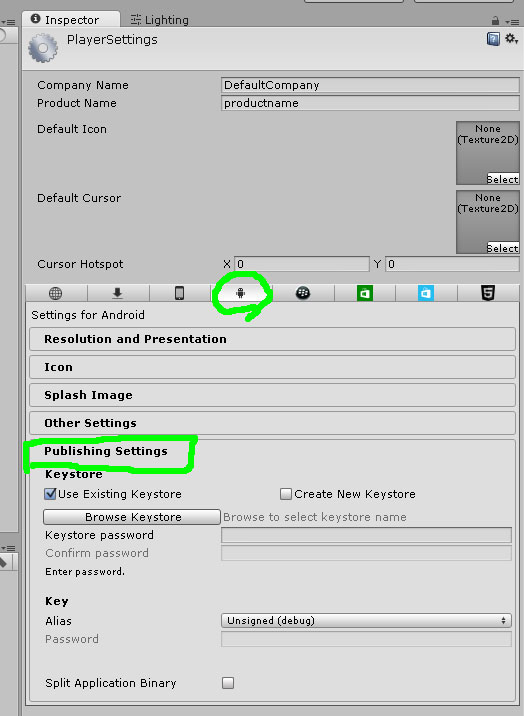
– Click button “Player Settings” (image#1)
– Select “Publishing Settings” (image#2)
– Click [x] Create New Keystore
– Click Browse Keystore
– “Create a new keystore” Save the file to default location (image#3)
– Enter Keystore password:
– Enter Confirm password: (*same as above^)
– From the Key, Alias dropdown, select “Create new key” (image#4)
– Fill in the details (only alias & passwords are required, but fill in the rest also. Use same password that you used above^) (image#5)
– Click “Create key” button
– From the Key, Alias dropdown, select “youralias” *It displays the alias here which you entered above^
– Done!

Docs:
http://docs.unity3d.com/Manual/class-PlayerSettingsAndroid.html

Image#1: Player settings
player_settings_1

Image#2: Android / Publishing settings

player_settings_2

Image#3: Creating new keystore

create_new_keystore1

Image#4: Select create new key

player_settings_3

Image#5: Creating new key

create_new_keystore2


Converting videos to .ogg manually with QuicktimeTools.exe

$
0
0

quicktimetools_convert_video_to_ogg

HOW TO
– Open command prompt
– Go to your unity5 data folder, for example, C:\Program Files\Unity\Editor\Data\Tools\
– Run this command below to convert your videos: (*set correct paths to input and output videos, unless they are in the same directory)
> QuicktimeTools.exe transcode -input “yourvideo.mp4” -output “yourvideo.ogg”-vbr “4100000.000000” -abr “156000.000000”

BENEFITS
– Progress bar is displayed for the conversion!!1 (its super slow for big files..)
– You can cancel conversion with CTRL+C in the command prompt window
– You can keep working on unity while its converting
– Can open multiple command prompts to convert multiple files at the same time

OTHER NOTES

– If video importing doesnt work inside unity, download latest QuickTime player : https://www.apple.com/quicktime/

Rotating Sphere By The Moved Distance

Mecanim Simple Trigger Animation Example

$
0
0

mecanim_unity_trigger_shoot_anim_1

Simple test project, triggering shoot animation on key press, and not triggering it, if its already running.
Also one Animation event call included, could be used to spawn the projectile at correct frame.

Project sources:
https://github.com/unitycoder/UnityMecanimBasicAnim

Resources:
– Sprite created with Universal LPC Sprite Sheet Character Generator

References:
http://docs.unity3d.com/ScriptReference/Animator.StringToHash.html (should be better than using strings)
http://docs.unity3d.com/ScriptReference/AnimatorStateInfo-shortNameHash.html
http://docs.unity3d.com/ScriptReference/Animator.SetTrigger.html (Easier to use than Bool parameter, automatically gets set back to false)

Publishing to Ouya (2016)

$
0
0

Founded my old sad little Ouya box and decided to try if publishing to it still works from Unity..

PUBLISH TO OUYA 2016 :)

– I’m using 5.3.1p2
– Download example project: https://github.com/ouya/ouya-sdk-examples/tree/master/Unity
– Unzip and open the project (I used CharacterController project, Scene3rdPerson.scene)
– Download Core package (this seems to be latest available?) https://github.com/ouya/ouya-sdk-examples/releases/tag/Unity-OuyaSDK-Core
– Import package to that example project (otherwise it shows missing scripts, reopen the scene if it had missing script before)
– File/Build settings
– Add your scene to the list, if not there
– Switch to Android platform
– Player Settings / Android tab: *See docs: https://github.com/ouya/docs/blob/master/unity.md
– Landscape Left
– [x] Status bar hidden
– Use 32-bit display buffer [ ]
– Use 24-bit display buffer [ ]
– Minimum API: 16
– Lets just try building APK right away, Builds your APK to some folder on your PC
– Start Ouya
– Go to Make > Upload : Click that upload button
– Then on your pc go to that IP address given (your Ouya should be connected to the same network)
– Your browser displays upload page
ouya_browser_upload_apk
– Drop your APK there ..wait for the upload to finish *Note: OUYA is not connected to your PC with USB cable
– Your game is displayed in A-Z list (mine was CharacterController)
– WOW it actually runs and controller works too, would had not believed it! oO
ouya_game_installed_unity
Ok, next going to try to port this old test game to Ouya, will add notes later..

Older Ouya publishing notes, including how it was connected to windows, lots of steps.. just use the new browser upload
http://unitycoder.com/blog/2013/06/26/publishing-to-ouya-from-unity3d/

Resources:
ODK (original download page seems to be down? https://devs.ouya.tv/developers/odk , I didn’t install ODK, so i guess no longer needed for builds?) https://devs-ouya-tv-prod.s3.amazonaws.com/odk/odk-2.0.1.zip

Instructions:
https://github.com/ouya/docs/blob/master/unity.md

Examples:
https://github.com/ouya/ouya-sdk-examples/tree/master/Unity
https://github.com/ouya/unity-2d-demo

Controller Framework:
https://github.com/rendermat/OuyaInputFramework

Publishing to Android TV

$
0
0

Quite meaningless “tutorial”, as it was too easy to build .apk to android TV from unity.. :)

BUILD APK

– Build android .apk as usual (i used all the default settings for testing.. just enter your company name and bundle identifier)
– Apparently these should be on (and they are by default)
android_tv_support
– Publish and copy the .apk to USB stick

INSTALLING TO TV

– Install some android filemanager, like: https://play.google.com/store/apps/details?id=com.estrongs.android.pop&hl=en
– Plug in the USB stick
– Browse to the .apk file and double click it (helps to have mouse plugged in the TV/box)
– It says cannot install from unknown sources, click the settings button
– [x] Enable installing from unknown sources
– Go back and double click the .apk again
– Install, Run, Done!

Surprisingly even the arrow keys and fire (OK button) worked from the TV remote controller 😮

install_apk_to_android_tv_from_unity_1

bombrush_android_tv_1

bombrush_android_tv

quality_photo_no_noise_android_tv_unity

ISSUES

– “Handheld.PlayFullScreenMovie” doesnt seem to work in Sharp Aquos TV
– How to access log files on the TV?

RESOURCES

– Key mappings : http://forum.unity3d.com/threads/amazon-fire-tv-is-a-streaming-set-top-box-and-game-console.237997/#post-1585840


UI Scroll View automatic Content height

$
0
0

“Hidden” inside the docs ( http://docs.unity3d.com/Manual/HOWTO-UIFitContentSize.html ) you can find details how to make UI ScrollView content to have automatic size based on the child objects. Here’s images how to use it:

Add “Vertical Layout Group” and “Content Size Fitter” components to the Content gameobject,
and set “Vertical Fit: Preferred Size”. Now your scroll bar will

unity_ui_scrollview_automatic_content_height_1

Then your Text gameobject will also have automatic height (enter any amount of text, even if Text “Vertical Overflow” is set to “Truncate”)

unity_ui_scrollview_automatic_content_height_2

*Note: If the Scroll View cannot be scrolled (it seems to be locked), then add UI/EventSystem to your scene (it was missing on those screenshots)

Latitude Longitude Position On 3D Sphere (V2)

$
0
0

latitude_longitude_unity_1

This is just a c# conversion and few updated notes for the old post : http://unitycoder.com/blog/2011/08/09/latitude-longitude-on-3d-sphere/

Instructions
– Attach the script below to your sphere (Unity sphere UV mapping is not suitable so I downloaded this sphere model and scaled transform to 5)
– Add earth texture map to the sphere (its included in the old version package)
– Add a marker sphere, scale it to 0.3 or so
– Assign marker sphere to “marker” field on the script
– Set lat long values in the inspector (default value is for London, get more values from here www.findlatitudeandlongitude.com )
– Note: Rotate your earth sphere by 180 degrees in Y axis (otherwise marker goes to wrong position) *Probably not needed
– The hit play to test it.

Resources:
– Map texture was taken from somewhere here : http://visibleearth.nasa.gov/view_cat.php?categoryID=1484
– Original math code is from: http://www.actionscript.org/forums/index.php#post722957 *link broken..


Script source


Decode QRCode with ZXing.net + Unity

$
0
0

Simple example to decode QRCode from texture image.

– Download XZing.net from http://zxingnet.codeplex.com/
– Unzip, Copy zxing.unity.dll from Unity/ folder into your Unity project (create Plugins/ folder and place the dll there)
– Download some QRCode image, like: http://vrbox.in/wp-content/uploads/2015/11/QR-Code1.jpg
– Create new script (see source below)
– Attach script to empty gameobject
– Assign your QRCode texture into inputTexture field
– Hit Play!
– See console output:

  QR_CODE
  goo.gl/BF4kdV


Your Project window structure

xzing_unity

Source: ReadBarcodeFromFile.cs

Using RenderDoc with Unity

$
0
0

RenderDoc is a stand-alone graphics debugging tool

Getting Started
– Download standalone https://renderdoc.org/builds
– Install it
– Start Unity 5.3 or later (I tested with 5.4beta.f2)
– Right click over the Game- or Scenewindow title, RenderDoc option should be displayed in the menu, Select it
unity-load-renderdoc
– New icon appears next to “Maximize on Play” or “Gizmos”
unity-capture-renderdoc
– Click that icon to capture next frame into RenderDoc (takes a while to start)
– RenderDoc opens, double click the thumbnail in “Captures collected list” to select capture
– All kind of random data & magical numbers are displayed 🙂

Resources
RenderDoc Tutorials : https://www.youtube.com/watch?v=kkySSu2MPKQ
RenderDoc Docs : https://renderdoc.org/docs/index.html
Unity Docs : https://docs.unity3d.com/Manual/RenderDocIntegration.html

RenderDoc sources
https://github.com/baldurk/renderdoc

Other tools
– Intel Graphics Performance Analyzer : https://software.intel.com/en-us/gpa
– AMD GPU Shader Analyzer : http://developer.amd.com/tools-and-sdks/graphics-development/gpu-shaderanalyzer/

Using XBox One Kinect with Unity

$
0
0


kinect_unity_greenscreen
*main image: Kinect GreenScreen example scene

Setting up Kinect with Windows 10
– connect to pc (using adapter)
– Driver installs automatically and you are Done 🙂
– You can test it with these apps:
3d scan: https://www.microsoft.com/en-us/store/p/3d-scan/9nblggh68pmc
3d builder: https://www.microsoft.com/en-us/store/p/3d-builder/9wzdncrfj3t6


Using Kinect XBox One with Unity 5 (I tested with Unity v5.50b5)
– Download & install Kinect SDK https://www.microsoft.com/en-us/download/details.aspx?id=44561  (i’m using v2.0_1409)
– UnityPackage is here https://msdn.microsoft.com/en-us/library/dn782041.aspx (package download)
– Import Kinect.2.0.1410.19000.unitypackage into your project
– Also Copy GreenScreen/ and KinectView/ folders from the zip to your project (they contain the sample scenes)
– One shader is giving this error message: “‘Shader error in ‘DX11/GreenScreenShader’: Fragment program ‘frag’: sampler ‘SampleType’ has no matching texture and will be undefined”

Fix is in the unity forums by @Michal

//sampler SampleType;
sampler sampler_MainTex;
//o = _MainTex.Sample(SampleType, i.tex);
o = _MainTex.Sample(sampler_MainTex, i.tex);

https://forum.unity3d.com/threads/official-ms-kinect-unity-package-green-screen-shader-error.382295/#post-2484117

– To fix rest of the errors, run Unity Api Updater if it didn’t run automatically (from menu: Assets / Run Api Updater..)
– Open sample scene: GreenScreen/MainScene or KinectView/MainScene
– Hit play and it should work!

More Resources:
– Kinect experiments: http://www.kinecthacks.com/

Adding Custom Script Templates

$
0
0

custom-editor-script-template

Adding custom script templates is quite simple:
– Create your custom script
– Replace all class name strings with #SCRIPTNAME# (this will get replaced by the new created script name)
– Move the script file under your unity installation folder: \Unity\Editor\Data\Resources\ScriptTemplates\
– Rename “YourScript.cs” into “81a-C# Your Script-YourNewScript.cs.txt” (’81a’ is the menu location, so this would appear below the default c# script)

Note:
– This folder gets replaced if you install new Unity version!
– You need to restart unity after you have placed the file on that folder (otherwise its not visible in the menu)
– You can remove the “82-Javascript-NewBehaviourScript.js.txt” if you don’t need javascript files, saves some space on the menu..

Example editor script template:
https://github.com/UnityCommunity/UnityLibrary/blob/master/ScriptTemplates/81a-C%23%20Editor%20Script-NewEditorScript.cs.txt


References:
https://support.unity3d.com/hc/en-us/articles/210223733-How-to-customize-Unity-script-templates

Using Accord.NET with Unity

$
0
0

accord-net-unity-gaussian

While looking for Harris Corner Detection examples, without using openCV, founded this framework:
“The Accord.NET Framework is a machine learning framework combined with audio and image processing libraries completely written in C#”

Website: http://accord-framework.net
Github: https://github.com/accord-net/framework

How to get it running with Unity
– Open new empty project in Unity (I Used 5.5.0b10)
– Edit/Project Settings/Player, set Api compatibility Level to .NET2.0 (instead of .NET2.0 Subset)
– Download framework from https://github.com/accord-net/framework/releases ( I took v3.3.0 )
– Copy DLL’s from that package (from “Release/net35/” folder) into your projects Assets/Plugins/ folder
– Also copy System.Drawing.dll from your c: drive into “Assets/Plugins/” folder (should be version 2.0, I founded mine from “C:\Windows\Microsoft.NET\Framework\v2.0.50727\”)
– Create c# script and use the code below (*This was just a quick test to get it running, testing Gaussian filter on texture)
– See my scene setup screenshot below the source

Image#1: Scene setup screenshot
– Add 2 Quads with different materials (use Unlit/Texture shader)
– Assign your source texture into QuadSource *Note: Texture importer settings must have [x] Read/Write enabled
– Assign those 2 quads into the script (which you have in some gameobject in scene) and hit Play!

accord-net-unity-tutorial


*Main image: Using Gaussian filter from Accord.NET

Viewing all 58 articles
Browse latest View live